ECE241F Lab 2
4.0 PC Set-Up Information for the Machines in GB 144/150 and Running Maxplus2
The PCs in the lab are new, and we have only just got the networking functioning. I'm afraid that there are a few weird things you'll have to do at the moment, to make it all work. Hopefully, this will be smoothed out soon.
- Logging in to get your ECE ugsparc files attached to this machine. The PC should be showing you a login prompt. If not, reboot it using the Start menu in the lower left hand corner, by selecting the "shutdown" menu item. Log in using your password for the ECE ugsparcs. Do this by clicking the mouse in the appropriate dialog box with your login name and password. Don't type return until you've put in both the name and password! (If the login doesn't succeed, you'll have to shutdown the machine as described above).
- 2. Mapping your ECE ugsparc files to a specific drive on the PC, setting up an Initialization file and Starting Maxplus2. Unfortunatley, to set up the initialization file properly, we have to open a DOS command window:
- Click on the Windows 95 Start button in the lower left hand corner of the screen and select the Run menu item. In the dialog box type: command (if it isn't there already) and select OK. This will bring up a DOS window.
- ii. Type the following command replacing the your_login_name below with your ECE ugsparc login name.
max your_login_name
You will be prompted to answer two questions - first asking which year you are in (which is likely 2nd year), and then if you should run the software from the local drive. Answer Y to the second question (indicating that maxplus2 is to be run from the local drive; this is much faster). This command installs a copy of the file maxplus2.ini in the directory max2work, (it creates this directory if you haven't done this already) and sets an environment variable that tells maxplus2 to look for the maxplus2.ini file at that location, and then starts the maxplus2 software running.
- 3. With maxplus2 running, you can open your project and compile your design as described in Tutorials #1 and #2. Before downloading, go to step 4 below. You will need to specify which pins to use for your inputs and outputs, to make sure that the pins used are available from the connector (some of the pins are hard-wired to devices on the board, and are not connected to the header). Table 1 lists which pins are available on the header.
- 4. Before downloading your designs into the board, connect a 60-pin cable from the board into a protoboard - A TA will demonstrate this. Be sure to use the header that is closest to the MAX 7128 device, not the one at the other end of the board.
Notice that the cable can only plug into the header one particular way, because the headers have "keys" which prevent incorrect insertion. The header itself is numbered as follows, as viewed from the top: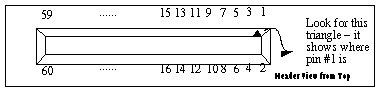
Be sure that the power to the Altera board is off and the power to protoboard is off. Using diagram above and Table 1 do the following:
- Make a common ground between the board by connecting pin #2 of the header to the ground of the protoboard. (Otherwise the signals won't have a common reference point, and the voltages seen by either side will be wrong).
- ii. Connect your input signals from the digital board switches to the correct input pins for your circuit on the protoboard header - i.e to those pins that correspond to the pins you selected on the MAX 7128S chip. You have to check Table 1 below to see the correspondence between the MAX 7128 chip pins and header pins. Connect your outputs to digital board lights in a similar way.
- iii. Turn on the power to the altera board and protoboard.
- iv. Download and test your circuit, using the instructions from Tutorial #2.